If you are on Windows 11 you should use Snap Layouts to arrange your windows
If there’s one thing Windows outshines all other operating systems, it’s got to be window management. Snap layouts are the most recent upgrade and it’s easy to use.
I've been using Windows 11 since it was in beta, and I have to say it: I was drawn by how it looks more than anything else. Finally, we can say Windows' design is more mature than Mac OS. At least I can.
If we talk about new functionality there's not much novelty to be honest, except one thing: snap layouts. This is unique to Windows 11 and is basically a set of predefined monitor grids you can use to arrange your app windows.
It's useful even if you have just one small monitor, but it shines on bigger displays and on multi-monitor setups. That's why I believe snap layouts deserve the subtitle you see below.
Snap layouts: window management done right
Let's see what it's all about and how you can use it in practice. You have two options to activate them:
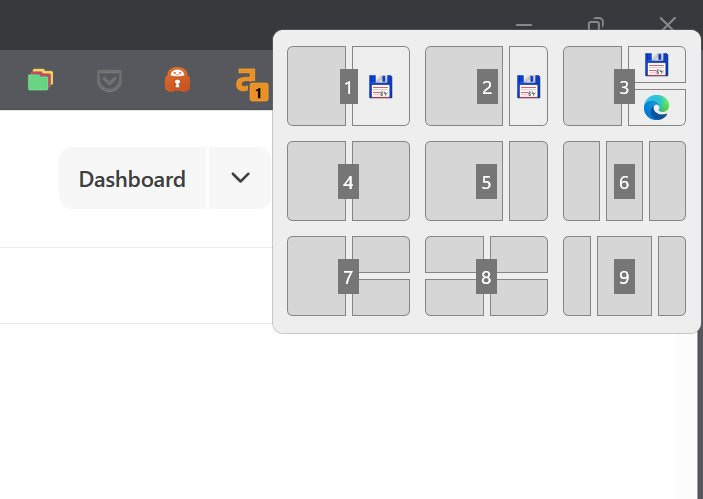
1. Hover your mouse cursor over the maximize/restore window control. You'll get this:
2. Press Win + Z and you will get this instead:
The difference between the two methods is that you can use the mouse or the numbers you see displayed to select the preferred layout.
Here's an example of what happens next if you choose layout 7, which splits the monitor in three areas. After selecting the 7th layout, let's say with the keyboard, you will see the numbers 1, 2, and 3 displayed on the three fragments of the 7th layout.
If you press 1 the current window will take the left half of the screen.
The remaining area is split in two and you are invited to select the app from a list of thumbnails which will occupy the second fragment:
Now you will have to select the app for the third fragment:
Once done the three apps will become snapped together. This means you can drag from any of the borders and resize adjacent apps at the same time.
It is all best shown in the video below:
Limitations: you cannot control the 9 predefined grid layouts. Windows creates them automatically based on your current monitor which contains the active window. I believe Windows 11 also takes into consideration the screen resolution and scaling factor.
What if you’re on Windows 10?
The next part applies to both Windows 10 and Windows 11. It’s the precursor of snap layouts and I still use it because it works.
Without further due, here’s how to arrange your windows using only the keyboard. First, make sure the window you want to arrange is active. Click on its title, just to be sure.
Press the Win key and keep it pressed, then press the:
Right arrow to resize the window to half the screen and pin it to the right of your monitor.
Left arrow to resize the window to half the screen and pin it to the left of your monitor.
Up arrow to maximize the window. Press Down immediately and it will restore the window to its original size.
Down arrow to minimize the window. Press Up and immediately it will restore the window to its original size.
Other sequences are also possible. If you press the Win key, then Left and Up the window will resize to a quarter of the screen and will be placed in the top left corner. If you keep the Win key pressed, then the Right arrow, the window will be resized to half the screen and pinned to the top of the monitor (Win + Left + Up + Right).
On multi monitor configurations, you can keep pressing the key that points towards the other display, and the app will move seamlessly between monitors.
When you're done with placing the window, you can release the Win key and Windows will show you a list of app thumbnails in the empty space. If you choose one instead of pressing Esc the selected app will be resized to take the remaining portion of the screen.
I’ve added a video to show you how it works in practice. It was recorded in Windows 11, but it works the same way in Windows 10.
You don’t know how much time you can save with the snapping functionality until you try to do the same on a Mac. No really, just try and see how natural and fast you can manage your apps in Windows. There’s a huge difference, especially if you have more than one monitor and/or you juggle with multiple app windows at the same time.
Note: if you are on Windows 10 and you don’t plan to upgrade just for the snap layouts functionality you can always install PowerToys and use the Fancy Zones module. Read my review first if you’re not sure.
If you want more control over the snap layout grids, then you can also try PowerToys in Windows 11. It works just as well. Personally, I prefer to use the snap layouts feature.
Previous tips you may have missed
If you find your desktop cluttered by dozens of apps and you want to get your focus back, Windows has a few quick ways to minimize windows on your desktop and a clever way to peek at what’s underneath.


